[Pet](https://www.tractorsupply.com/tsc/catalog/pet)[Lawn & Garden](https://www.tractorsupply.com/tsc/catalog/lawn-garden)[Truck & Automotive](https://www.tractorsupply.com/tsc/catalog/truck-automotive)[Clothing](https://www.tractorsupply.com/tsc/catalog/clothing)[Poultry](https://www.tractorsupply.com/tsc/catalog/poultry)[Heating & Cooling](https://www.tractorsupply.com/tsc/catalog/heating-cooling)[Horse](https://www.tractorsupply.com/tsc/catalog/horse)[Sporting Goods](https://www.tractorsupply.com/tsc/catalog/sporting-goods)[Outdoor Power Equipment](https://www.tractorsupply.com/tsc/catalog/outdoor-power-equipment)[Fencing & Gates](https://www.tractorsupply.com/tsc/catalog/fencing-gates)[Livestock](https://www.tractorsupply.com/tsc/catalog/livestock)[Outdoor Living](https://www.tractorsupply.com/tsc/catalog/outdoor-living)[Pet & Animal Pharmacy](https://www.tractorsupply.com/tsc/catalog/pet-animal-pharmacy)[Tools](https://www.tractorsupply.com/tsc/catalog/tools)[Home Improvement](https://www.tractorsupply.com/tsc/catalog/home-improvement)[Farm & Ranch](https://www.tractorsupply.com/tsc/catalog/farm-ranch)[Boots & Shoes](https://www.tractorsupply.com/tsc/catalog/boots-shoes)[Trailers & Towing](https://www.tractorsupply.com/tsc/catalog/trailers-towing)[Home Decor & Furniture](https://www.tractorsupply.com/tsc/catalog/home-decor-furniture)[Wild Birds & Wildlife](https://www.tractorsupply.com/tsc/catalog/wild-birds-wildlife)[Toys](https://www.tractorsupply.com/tsc/catalog/toys)[Gift Cards](https://www.tractorsupply.com/tsc/catalog/gift-cards-3074457345616710669-1)[Services](https://www.tractorsupply.com/tsc/services) [Propane Refill](https://www.tractorsupply.com/tsc/services/propane-refill-Franklin-TN-37069-2314)[Trailer Rental](https://www.tractorsupply.com/tsc/services/trailer-rental)[Garden Center](https://www.tractorsupply.com/tsc/services/garden-center-Franklin-TN-37069-2314)[Feed Center](https://www.tractorsupply.com/tsc/services/feed-center-Franklin-TN-37069-2314)[Same Day Delivery](https://www.tractorsupply.com/tsc/services/same-day-delivery)[PetVet Clinic](https://www.tractorsupply.com/tsc/services/petvet)[Pet Wash](https://www.tractorsupply.com/tsc/services/pet-wash)[Grooming at Petsense](https://www.tractorsupply.com/tsc/services/grooming-at-petsense)[Dog Training at Petsense](https://www.petsense.com/pages/training)[Tractor Supply Rx](https://www.tractorsupply.com/tsc/category/pet-animal-pharmacy)[Pet Insurance](https://quote.petted.com/quote/ref=tractor?cm_sp=Navi-_-Pet%20L1-_-Insurance)[Wag!](https://wagwalking.com/partners/tractor-supply?isIntSrch=written)
"Savings and Offers"
[Weekly Ad](https://www.tractorsupply.com/tsc/cms/digital-flyer)[Sale](https://www.tractorsupply.com/tsc/sale)[Clearance](https://www.tractorsupply.com/tsc/clearance)
"More Options"
[Weekly Ad](https://www.tractorsupply.com/tsc/cms/digital-flyer)[What's New](https://www.tractorsupply.com/tsc/whatsnew)[Tractor Supply App](https://www.tractorsupply.com/tsc/cms/app)[Earn Rewards with Neighbor's Club](https://www.tractorsupply.com/tsc/cms/neighbors-club)[Hometown Heroes](https://www.tractorsupply.com/tsc/myaccount/herobenefits)[Life Out Here Blog](https://www.tractorsupply.com/tsc/cms/life-out-here)[TSC Exclusive Brands](https://www.tractorsupply.com/tsc/cms/exclusive-brands)[Top Brands](https://www.tractorsupply.com/tsc/brands)[Clearance Items](https://www.tractorsupply.com/tsc/clearance)[Battery Finder](https://tractorsupply.interstatebatteries.com/?cm_sp=Header-_-Shop-_-Battery_Finder)[Outdoor Power Equipment Parts Finder](http://www.ordertree.com/tsc/?cm_sp=Header-_-Shop-_-Parts_Finder)[Hitch Finder](https://www.reesetowpower.com/tractor-supply/?cm_sp=Header-_-Shop-_-Hitch_Finder)
Demo Days are at your store this weekend
|
[Shop Now](https://www.tractorsupply.com)
[Order status](https://www.tractorsupply.com/OrderLookUpView)[TSC Credit Cards](https://www.tractorsupply.com/tsc/cms/credit)[What’s new](https://www.tractorsupply.com/tsc/whatsnew)[Petsense](https://www.petsense.com/)[Weekly Ad](https://www.tractorsupply.com/tsc/cms/digital-flyer)
[](https://www.tractorsupply.com)
[](https://www.tractorsupply.com/)
Grassland (Franklin) TN
GRASSLAND (FRANKLIN) TN #2314
[2176 Hillsboro RD STE 122
Franklin, TN 37069](https://www.google.com/maps/search/?api=1&query=Tractor%20Supply%20Co.%201650%20Denmark%20RD%2CUnion%2CMO%2063084)
Open at 8:00 am
615-595-5700
Store Hours:
[Details](https://www.tractorsupply.com/tsc/store_Franklin-TN-37069_2314)
Grassland (Franklin) TN
Open till 9 pm
Deliver to
37027
Sign In / Enroll
Get Rewarded!
Sign In / Enroll
Get rewarded!
[](https://www.tractorsupply.com/tsc/cart)
Pet
Lawn & Garden
Truck & Automotive
Clothing
Poultry
Heating & Cooling
Horse
Sporting Goods
Outdoor Power Equipment
Fencing & Gates
Livestock
Outdoor Living
Pet & Animal Pharmacy
Tools
Home Improvement
Farm & Ranch
* * *
[__Deals to start the season off right -__ Shop now>](https://www.tractorsupply.com/tsc/cms/digital-flyer)
[](https://www.tractorsupply.com/tsc/cms/life-out-here)
* * *
CATEGORIES
Pets
- [Dogs](https://www.tractorsupply.com/tsc/cms/life-out-here/pet/dogs)
- [Cats](https://www.tractorsupply.com/tsc/cms/life-out-here/pet/cats)
- [All](https://www.tractorsupply.com/tsc/cms/life-out-here/pet)
The Barn
- [Horse](https://www.tractorsupply.com/tsc/cms/life-out-here/the-barn/horse)
- [Livestock](https://www.tractorsupply.com/tsc/cms/life-out-here/the-barn/livestock)
- [Goats & Sheep](https://www.tractorsupply.com/tsc/cms/life-out-here/the-barn/goats-and-sheep)
- [Pigs](https://www.tractorsupply.com/tsc/cms/life-out-here/the-barn/pigs)
- [All](https://www.tractorsupply.com/tsc/cms/life-out-here/the-barn)
The Coop
- [Start Your Flock](https://www.tractorsupply.com/tsc/cms/life-out-here/the-coop/start-your-flock)
- [Poultry Breeds](https://www.tractorsupply.com/tsc/cms/life-out-here/the-coop/poultry-breeds)
- [Coop Tips](https://www.tractorsupply.com/tsc/cms/life-out-here/the-coop/coop-tips)
- [Chick Care](https://www.tractorsupply.com/tsc/cms/life-out-here/the-coop/chick-care)
- [All](https://www.tractorsupply.com/tsc/cms/life-out-here/the-coop)
Garden
- [Gardening Tips](https://www.tractorsupply.com/tsc/cms/life-out-here/garden/gardening-tips)
- [Growing Guides](https://www.tractorsupply.com/tsc/cms/life-out-here/garden/growing-guides)
Home & Land
- [Fresh Recipes](https://www.tractorsupply.com/tsc/cms/life-out-here/garden-home-land/fresh-recipes)
- [Heating & Cooling](https://www.tractorsupply.com/tsc/cms/life-out-here/garden-home-land/heating-and-cooling)
- [Bees](https://www.tractorsupply.com/tsc/cms/life-out-here/garden-home-land/bees)
- [Lawn](https://www.tractorsupply.com/tsc/cms/life-out-here/garden-home-land/lawn)
- [Fencing](https://www.tractorsupply.com/tsc/cms/life-out-here/garden-home-land/fencing)
- [All](https://www.tractorsupply.com/tsc/cms/life-out-here/garden-home-land)
Tool Shop
- [The Garage](https://www.tractorsupply.com/tsc/cms/life-out-here/tool-shop/the-garage)
- [Tool Tips](https://www.tractorsupply.com/tsc/cms/life-out-here/tool-shop/tool-tips)
- [Stock Your Shop](https://www.tractorsupply.com/tsc/cms/life-out-here/tool-shop/stock-your-shop)
- [All](https://www.tractorsupply.com/tsc/cms/life-out-here/tool-shop)
Outdoor Life
- [Birding](https://www.tractorsupply.com/tsc/cms/life-out-here/outdoor-life/birding)
- [Recreation](https://www.tractorsupply.com/tsc/cms/life-out-here/outdoor-life/recreation)
- [Hunting](https://www.tractorsupply.com/tsc/cms/life-out-here/outdoor-life/hunting)
- [All](https://www.tractorsupply.com/tsc/cms/life-out-here/outdoor-life)
1. [Home](https://www.tractorsupply.com/tsc/cms/life-out-here)
2. [Home & Land](https://www.tractorsupply.com/tsc/cms/life-out-here/garden-home-land)
3. [Fencing](https://www.tractorsupply.com/tsc/cms/life-out-here/garden-home-land/fencing)
4. How to install t-post fencing
# How to install t-post fencing
Aug 10, 2021
[Authored by Jemma Petts](https://www.tractorsupply.com)

Installing metal fence posts, commonly called T-posts or Y-posts, provides a durable, low-cost, and easy-to-install solution for keeping predators, pests, or livestock in or out of a particular area. [T-post installation](https://www.youtube.com/watch?v=PPaEsSJjR64) is relatively straightforward and can be accomplished by most DIYers.
* * *
## What you need to install T-posts
Installing a T-post wire fence requires a few tools and a handful of materials. Most handy DIYers will already own many of the tools needed, and the others are easily acquired along with the necessary materials at your [local supply store](https://www.tractorsupply.com/tsc/store-locator "Links to TSC store locator.").
### Materials
- [Wooden posts](https://www.tractorsupply.com/tsc/catalog/wood-posts): Used at the corners and gate opening to withstand tension
- [T-posts](https://www.tractorsupply.com/tsc/catalog/t-posts): Use one for every 8 to 12 feet of fence line
- [Wire clips](https://www.tractorsupply.com/tsc/product/zareba-t-post-wire-clips-pack-of-100): Used to secure the fence to the T-post
- [Staples](https://www.tractorsupply.com/tsc/catalog/fencing-hardware): Used to secure the fence at the corners
### Tools
- [T-post driver](https://www.tractorsupply.com/tsc/catalog/post-drivers): Used to install metal fence posts
- [Tape measure](https://www.tractorsupply.com/tsc/catalog/tape-measures-wheels): Ensures proper fence post spacing and consistent height
- String: To use as a guide to set your fence line straight
- Come-along: Keeps tension in the wire fencing
- [Fence pliers](https://www.tractorsupply.com/tsc/catalog/fence-pliers): Help connect fencing to fence posts
For safety, wear pants, a long-sleeve shirt, work gloves, and eye protection when installing field fence posts.
* * *
## Step-by-step guide to installing T-posts
Follow these steps to safely and correctly install your new T-post fence.
## Step 1: Establish your corners
When installing metal fence posts, the first step is to establish the fence line’s corners and gates with wooden fence posts. Metal wire fences place a great deal of tension on the ends of an enclosure. To stand up to the pressure, fence corners and gates are best built with a [solid wood fence post set in concrete](https://www.tractorsupply.com/tsc/cms/life-out-here/garden-home-land/fencing/how-to-set-fence-posts-in-concrete-and-gravel) and braced.
## Step 2: Line up and space the posts
With the corners set and braced, run a guideline between them to ensure the T-posts are placed in a straight line. Use a tape measure to make sure there’s even spacing between the posts. A general guideline for metal fence post spacing is to set them 8-12 feet apart; 10-12 feet is sufficient for a five- to six-strand barbed wire fence. Before you begin installation, lay the posts on the ground around the guideline to verify spacing and the number of posts needed.
## Step 3: Position the posts
Position each T-post with the anchor plate at the bottom and perpendicular to the fence line. Which way the T-posts face depends on if you want to keep livestock in or predators out. Face the T-posts with the studs inward if animals will be putting more pressure against the inside of the fence. If animals will be putting more pressure on the outside of the fence, direct the studs outward.
## Step 4: Drive the posts into the ground
To keep animals from pulling the posts out of the ground, drive the posts into the ground deep enough to completely bury the anchor, about 18-24 inches deep. A [post driver](https://www.tractorsupply.com/tsc/catalog/post-drivers) — a weighted pipe that slides over the top of a T-post — works best, but a sledgehammer or regular hammer works in a pinch. As the installation progresses, move along the fence line to ensure the anchors are in a straight line.
## Step 5: Install the wire
Wire tension is essential to keep livestock inside — and predators outside — a fence. Stretch the metal fencing by securing it at a corner with a few staples, leaving 18-24 inches of excess wire on the end. Wrap it around the mainline to guarantee a strong connection. On the opposite corner, use a come-along to pull the wire tight, secure it with a few more staples, and wrap the excess wire around the post. Avoid over-tightening—the wire should be taut but not guitar-string tight.
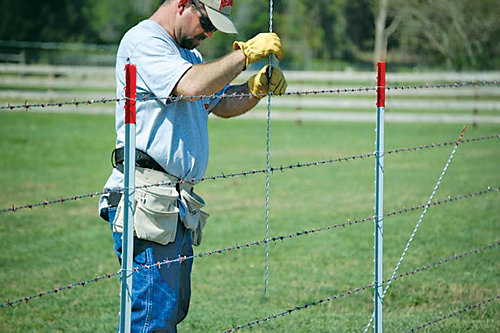
## Step 6: Add wire clips
Installing T-post clips keeps the fence wires from moving up and down and prevents them from getting pulled away from the posts. Set the wire clips in a stud on the T-post, hooking the wire with one side of the clip and wrapping the other side of the clip around the wire using a pair of fence pliers.
Barbed wire fence posts and other types of metal fencing are affordable, easy to install, and durable. This type of fence can be used for:
- Keeping livestock, like cattle, contained
- Preventing predators from getting at livestock
- Fending off pests, like deer, from gardens
- Dividing different properties
- Providing a play area for pets
In addition to offering a safe and secure closure, fences built with T-posts are safe, secure, long-lasting, and durable. The materials only require occasional inspection and periodic maintenance, making them the go-to choice for ranchers, farmers, and anyone with a property that requires fencing.
## FAQs

__How do I drive T-posts?__
The simplest way to drive T-posts is with a post driver. Hydraulic- and gas-powered post drivers are a good choice if you have several posts to set, while manual post drivers are simple to use, inexpensive, and reliable.
__How do I install a T-post without a driver?__
A sledgehammer or hammer can be used if a post driver isn’t available.
__How do I drive fence posts straight?__
A post driver is the easiest way to drive a T-post straight into the ground, and a small investment in a manual post driver is likely to bring a huge return in time. Another trick for driving straight fence posts is to save this project for spring when the ground is softer.
__How far apart should fence posts be?__
In general, T-posts are spaced between 8-12 feet apart, depending on what you’re trying to contain or keep out. Closer spacing is suggested for large livestock, like cattle, while wider spacing is fine for fending off deer and other large pests.
__How many clips per T-post do I need?__
A clip is needed for every piece of wire running along a T-post. For example, five wire clips are needed per T-post for a five-wire barbed fence, and six wire clips are needed if stringing a six-wire barbed fence. If hanging a mesh metal fence, more clips create a sturdier fence.
__How do I attach cattle panels to T-posts?__
Cattle fence posts are a popular alternative to wire. Cattle or livestock panels don’t require stretching and effectively contain cows, goats, and other livestock. To attach a cattle panel to a T-post, wrap a wire clip around the T-post and twist it on each side of a horizontal square of cattle panel with fencing pliers.
__How many T-posts per cattle panel do I need?__
[Cattle panels](https://www.tractorsupply.com/tsc/catalog/feedlot-panels) are traditionally sold in 16-foot sections. The panels typically require three T-posts: one at each end and one in the middle.
__What size T-post do I need?__
T-posts come in a variety of heights. A good rule of thumb is to get T-posts between 18 inches to three feet longer than the intended height of the fence. At a minimum, the metal flange should be at least two inches in the ground.
__U-post vs. T-post: What’s the difference?__
U-posts and T-posts both use wire fencing and are easy to install. U-posts are generally heavier duty and used for larger animals like cattle and horses. T-posts are easier to drive and reuse and are most commonly used to protect poultry or gardens.
Get the top deals, latest trends and more
Sign up for emails from Tractor Supply today.
First Name*
First Name*
Last Name*
Last Name*
Email*
Email*
Sign Up
### Customer Support
- [Order Status](https://www.tractorsupply.com/OrderLookUpView)
- [Return Policy](https://www.tractorsupply.com/tsc/customer-solutions#ProductReturns)
- [Delivery Options](https://www.tractorsupply.com/tsc/customer-solutions#DeliveryOptions)
- [Tax Exemptions](https://www.tractorsupply.com/tsc/cms/policies-information/customer-solutions/tax-exemption)
- [Frequently Asked Questions](https://www.tractorsupply.com/tsc/customer-solutions#CustomerFAQ)
- [Contact Us](https://www.tractorsupply.com/tsc/customer-solutions#contact)
- [Recall Notices](https://www.tractorsupply.com/tsc/cms/policies-information/customer-solutions/recall-notices.html)
- Call:
(877) 718-6750
- [](https://www.tractorsupply.com)
Mon - Sat: 7am - 9pm CT
- [](https://www.tractorsupply.com)
Sun: 8am - 7pm CT
- [](https://www.tractorsupply.com)
Closed Christmas Day
### About Us
- [Who We Are](https://corporate.tractorsupply.com/company-overview/company-profile/default.aspx)
- [Investor Relations](https://ir.tractorsupply.com/CorporateProfile)
- [Stewardship](https://corporate.tractorsupply.com/stewardship/overview/default.aspx)
- [Community](https://ir.tractorsupply.com/Peer)
- [Military Support](https://www.tractorsupply.com/tsc/cms/military)
- [Product Catalog](https://www.tractorsupply.com/a/pt/index)
- [Tractor Supply Stores](https://www.tractorsupply.com/tsc/store-locator)
- [.Pharmacy Verified Website](https://tractorsupply.com/tsc/cms/accreditation)
### Work With Us
- [Careers](https://www.tractorsupply.careers/?utm_source=corpsite&utm_campaign=TSC_Shop&cm_sp=footer-_-tsc%20careers)
- [Sponsorship](https://www.tractorsupply.com/tsc/cms/policies-information/about-tsc/sponsorships)
- [Affiliate Program](https://www.tractorsupply.com/tsc/cms/policies-information/affiliate-program)
- [Potential Vendor Partners](https://www.tractorsupply.com/tsc/cms/policies-information/vendor-information/potential-vendor-partners)
- [Vendor Information](https://www.tractorsupply.com/tsc/cms/policies-information/vendor-information/vendor-center)
- [Tractor Supply Media Network](https://www.tractorsupplymedianetwork.com/)
### Neighbor's Club
- [About](https://www.tractorsupply.com/tsc/cms/neighbors-club)
- [Rewards](https://www.tractorsupply.com/AccountDashboardView?catalogId=10051&langId=&storeId=10151&topNav=nCOfferReward%3Fcm_sp%3Dfooter-_-navigation-_-Neighbors%20Club%20Member)
- [Hometown Heroes](https://www.tractorsupply.com/tsc/myaccount/herobenefits)
- [Frequently Asked Questions](https://www.tractorsupply.com/tsc/cms/neighbors-club-faq)
- [Terms & Conditions](https://www.tractorsupply.com/tsc/cms/neighbors-club-terms-and-conditions)
### Credit Center
- [TSC Credit Card](https://www.tractorsupply.com/tsc/cms/credit)
- [Klarna](https://www.tractorsupply.com/tsc/cms/klarna)
### Stay Connected
Connect & Share with the Tractor Supply Community.
- [](https://www.facebook.com/TractorSupplyCo?cm_sp=footer-_-social%20icons-_-facebook)
- [](https://www.pinterest.com/tractorsupplyco?cm_sp=footer-_-social%20icons-_-pinterest)
- [](https://instagram.com/tractorsupply?cm_sp=footer-_-social%20icons-_-instagram)
- [](https://www.youtube.com/user/TSCTractorSupply?cm_sp=footer-_-social%20icons-_-youtube)
- [](https://www.tiktok.com/@tractorsupply?cm_sp=footer-_-social%20icons-_-tiktok)
### Tractor Supply App
Shop on the go with the Tractor Supply App
[Learn More](https://www.tractorsupply.com/tsc/cms/app.html)
[](https://apps.apple.com/us/app/id1502197298)
[](https://play.google.com/store/apps/details?id=com.consumerapp_v1)
### Customer Support
- [Order Status](https://www.tractorsupply.com/OrderLookUpView)
- [Return Policy](https://www.tractorsupply.com/tsc/customer-solutions#ProductReturns)
- [Delivery Options](https://www.tractorsupply.com/tsc/customer-solutions#DeliveryOptions)
- [Tax Exemptions](https://www.tractorsupply.com/tsc/cms/policies-information/customer-solutions/tax-exemption)
- [Frequently Asked Questions](https://www.tractorsupply.com/tsc/customer-solutions#CustomerFAQ)
- [Contact Us](https://www.tractorsupply.com/tsc/customer-solutions#contact)
- [Recall Notices](https://www.tractorsupply.com/tsc/cms/policies-information/customer-solutions/recall-notices.html)
- [Call:](https://www.tractorsupply.com) [(877) 718-6750](tel:%28877%29%20718-6750)
- [](https://www.tractorsupply.com)
Mon - Sat: 7am - 9pm CT
- [](https://www.tractorsupply.com)
Sun: 8am - 7pm CT
- [](https://www.tractorsupply.com)
Closed Christmas Day
### About Us
- [Who We Are](https://corporate.tractorsupply.com/company-overview/company-profile/default.aspx)
- [Investor Relations](https://ir.tractorsupply.com/CorporateProfile)
- [Stewardship](https://corporate.tractorsupply.com/stewardship/overview/default.aspx)
- [Community](https://ir.tractorsupply.com/Peer)
- [Military Support](https://www.tractorsupply.com/tsc/cms/military)
- [Product Catalog](https://www.tractorsupply.com/a/pt/index)
- [Tractor Supply Stores](https://www.tractorsupply.com/tsc/store-locator)
- [.Pharmacy Verified Website](https://tractorsupply.com/tsc/cms/accreditation)
### Work With Us
- [Careers](https://www.tractorsupply.careers/?utm_source=corpsite&utm_campaign=TSC_Shop&cm_sp=footer-_-tsc%20careers)
- [Sponsorship](https://www.tractorsupply.com/tsc/cms/policies-information/about-tsc/sponsorships)
- [Affiliate Program](https://www.tractorsupply.com/tsc/cms/policies-information/affiliate-program)
- [Potential Vendor Partners](https://www.tractorsupply.com/tsc/cms/policies-information/vendor-information/potential-vendor-partners)
- [Vendor Information](https://www.tractorsupply.com/tsc/cms/policies-information/vendor-information/vendor-center)
- [Tractor Supply Media Network](https://www.tractorsupplymedianetwork.com/)
### Neighbor's Club
- [About](https://www.tractorsupply.com/tsc/cms/neighbors-club)
- [Rewards](https://www.tractorsupply.com/AccountDashboardView?catalogId=10051&langId=&storeId=10151&topNav=nCOfferReward%3Fcm_sp%3Dfooter-_-navigation-_-Neighbors%20Club%20Member)
- [Hometown Heroes](https://www.tractorsupply.com/tsc/myaccount/herobenefits)
- [Frequently Asked Questions](https://www.tractorsupply.com/tsc/cms/neighbors-club-faq)
- [Terms & Conditions](https://www.tractorsupply.com/tsc/cms/neighbors-club-terms-and-conditions)
### Credit Center
- [TSC Credit Card](https://www.tractorsupply.com/tsc/cms/credit)
- [Klarna](https://www.tractorsupply.com/tsc/cms/klarna)
### Stay Connected
Connect & Share with the Tractor Supply Community.
- [](https://www.facebook.com/TractorSupplyCo?cm_sp=footer-_-social%20icons-_-facebook)
- [](https://www.pinterest.com/tractorsupplyco?cm_sp=footer-_-social%20icons-_-pinterest)
- [](https://instagram.com/tractorsupply?cm_sp=footer-_-social%20icons-_-instagram)
- [](https://www.youtube.com/user/TSCTractorSupply?cm_sp=footer-_-social%20icons-_-youtube)
- [](https://www.tiktok.com/@tractorsupply?cm_sp=footer-_-social%20icons-_-tiktok)
### Tractor Supply App
Shop on the go with the Tractor Supply App
[Learn More](https://www.tractorsupply.com/tsc/cms/app.html)
- [](https://apps.apple.com/us/app/id1502197298)
- [](https://play.google.com/store/apps/details?id=com.consumerapp_v1)
- [Privacy policy](https://www.tractorsupply.com/tsc/cms/policies-information/customer-solutions/privacy-policy.html)
- [Your Privacy Choices](#)
- [Terms and Conditions](https://www.tractorsupply.com/tsc/cms/policies-information/customer-solutions/terms-and-conditions-of-use.html)
- [California Transparency Act](https://www.tractorsupply.com/tsc/cms/policies-information/about-tsc/california-transparency-act-of-2010.html)
- [Legal Notices](https://www.tractorsupply.com/tsc/cms/policies-information/customer-solutions/legal-notices.html)
- [Accessibility](https://www.tractorsupply.com/tsc/cms/accessibility.html)
- [Responsible Disclosure Statement](https://www.tractorsupply.com/tsc/cms/policies-information/customer-solutions/responsible-disclosure-statement.html)
- [Surprise (Balance) Medical Billing Disclosure](https://www.tractorsupply.com/tsc/cms/surprise-billing)
- [Transparency in Coverage](https://transparency-in-coverage.uhc.com/?cm_sp=footer-_-navigation-_-transparency%20coverage)
- [Human Rights Policy](https://www.tractorsupply.com/tsc/cms/human-rights-policy)
- [Vendor Code of Conduct](https://www.tractorsupply.com/tsc/cms/vendor-code-of-conduct)
- [California Notice of Collection](https://www.tractorsupply.com/tsc/cms/policies-information/customer-solutions/privacy-policy#_Toc189006423)
- [Privacy Requests](https://privacyportal.tractorsupply.com/)
© 2026, Tractor Supply Co. All Rights Reserved.