[Pet](https://www.tractorsupply.com/tsc/category/pet)[Lawn & Garden](https://www.tractorsupply.com/tsc/category/lawn-garden)[Truck & Automotive](https://www.tractorsupply.com/tsc/catalog/truck-automotive)[Clothing](https://www.tractorsupply.com/tsc/category/clothing)[Poultry](https://www.tractorsupply.com/tsc/category/poultry)[Heating & Cooling](https://www.tractorsupply.com/tsc/category/heating-cooling)[Horse](https://www.tractorsupply.com/tsc/category/horse)[Sporting Goods](https://www.tractorsupply.com/tsc/category/sporting-goods)[Outdoor Power Equipment](https://www.tractorsupply.com/tsc/category/outdoor-power-equipment)[Fencing & Gates](https://www.tractorsupply.com/tsc/category/fencing-gates)[Livestock](https://www.tractorsupply.com/tsc/catalog/livestock)[Outdoor Living](https://www.tractorsupply.com/tsc/category/outdoor-living)[Pet & Animal Pharmacy](https://www.tractorsupply.com/tsc/category/pet-animal-pharmacy)[Tools](https://www.tractorsupply.com/tsc/category/tools)[Home Improvement](https://www.tractorsupply.com/tsc/category/home-improvement)[Farm & Ranch](https://www.tractorsupply.com/tsc/category/farm-ranch)[Boots & Shoes](https://www.tractorsupply.com/tsc/category/boots-shoes)[Trailers & Towing](https://www.tractorsupply.com/tsc/category/trailers-towing)[Home Decor & Furniture](https://www.tractorsupply.com/tsc/category/home-decor-furniture)[Wild Birds & Wildlife](https://www.tractorsupply.com/tsc/category/wild-birds-wildlife)[Toys](https://www.tractorsupply.com/tsc/category/toys)[Gift Cards](https://www.tractorsupply.com/tsc/catalog/gift-cards-3074457345616710669-1)[Services](https://www.tractorsupply.com/tsc/services) [Propane Refill](https://www.tractorsupply.com/tsc/services/propane-refill-Franklin-TN-37069-2314)[Trailer Rental](https://www.tractorsupply.com/tsc/services/trailer-rental)[Garden Center](https://www.tractorsupply.com/tsc/services/garden-center-Franklin-TN-37069-2314)[Feed Center](https://www.tractorsupply.com/tsc/services/feed-center-Franklin-TN-37069-2314)[Same Day Delivery](https://www.tractorsupply.com/tsc/services/same-day-delivery)[PetVet Clinic](https://www.tractorsupply.com/tsc/services/petvet)[Pet Wash](https://www.tractorsupply.com/tsc/services/pet-wash)[Grooming at Petsense](https://www.tractorsupply.com/tsc/services/grooming-at-petsense)[Dog Training at Petsense](https://www.petsense.com/pages/training)[Tractor Supply Rx](https://www.tractorsupply.com/tsc/category/pet-animal-pharmacy)[Pet Insurance](https://quote.petted.com/quote/ref=tractor?cm_sp=Navi-_-Pet%20L1-_-Insurance)[Wag!](https://wagwalking.com/partners/tractor-supply?isIntSrch=written)
"Savings and Offers"
[Weekly Ad](https://www.tractorsupply.com/tsc/cms/digital-flyer)[Sale](https://www.tractorsupply.com/tsc/sale)[Clearance](https://www.tractorsupply.com/tsc/clearance)
"More Options"
[Weekly Ad](https://www.tractorsupply.com/tsc/cms/digital-flyer)[What's New](https://www.tractorsupply.com/tsc/whatsnew)[Tractor Supply App](https://www.tractorsupply.com/tsc/cms/app)[Earn Rewards with Neighbor's Club](https://www.tractorsupply.com/tsc/cms/neighbors-club)[Hometown Heroes](https://www.tractorsupply.com/tsc/myaccount/herobenefits)[Life Out Here Blog](https://www.tractorsupply.com/tsc/cms/life-out-here)[TSC Exclusive Brands](https://www.tractorsupply.com/tsc/cms/exclusive-brands)[Top Brands](https://www.tractorsupply.com/tsc/brands)[Clearance Items](https://www.tractorsupply.com/tsc/clearance)[Battery Finder](https://tractorsupply.interstatebatteries.com/?cm_sp=Header-_-Shop-_-Battery_Finder)[Outdoor Power Equipment Parts Finder](http://www.ordertree.com/tsc/?cm_sp=Header-_-Shop-_-Parts_Finder)[Hitch Finder](https://www.reesetowpower.com/tractor-supply/?cm_sp=Header-_-Shop-_-Hitch_Finder)
Spend $49.99 to unlock Free Delivery on most orders
|
[Learn More](https://www.tractorsupply.com)
[Order status](https://www.tractorsupply.com/OrderLookUpView)[TSC Credit Cards](https://www.tractorsupply.com/tsc/cms/credit)[What’s new](https://www.tractorsupply.com/tsc/whatsnew)[Petsense](https://www.petsense.com/)[Weekly Ad](https://www.tractorsupply.com/tsc/cms/digital-flyer)
[](https://www.tractorsupply.com)
[](https://www.tractorsupply.com/)
Grassland (Franklin) TN
GRASSLAND (FRANKLIN) TN #2314
[2176 Hillsboro RD STE 122
Franklin, TN 37069](https://www.google.com/maps/search/?api=1&query=Tractor%20Supply%20Co.%201650%20Denmark%20RD%2CUnion%2CMO%2063084)
Open at 8:00 am
615-595-5700
Store Hours:
[Details](https://www.tractorsupply.com/tsc/store_Franklin-TN-37069_2314)
Grassland (Franklin) TN
Open till 9 pm
Deliver to
37027
Sign In / Enroll
Get Rewarded!
Sign In / Enroll
Get rewarded!
[](https://www.tractorsupply.com/tsc/cart)
Pet
Lawn & Garden
Truck & Automotive
Clothing
Poultry
Heating & Cooling
Horse
Sporting Goods
Outdoor Power Equipment
Fencing & Gates
Livestock
Outdoor Living
Pet & Animal Pharmacy
Tools
Home Improvement
Farm & Ranch
* * *
[Menu](https://www.tractorsupply.com)
Search
[Home](https://www.tractorsupply.com/)
Sign In
[Cart](https://www.tractorsupply.com/tsc/cart)
[__Deals to start the season off right -__ Shop now>](https://www.tractorsupply.com/tsc/cms/digital-flyer)
* * *
CATEGORIES
Pets
- [Dogs](https://www.tractorsupply.com/tsc/cms/life-out-here/pet/dogs)
- [Cats](https://www.tractorsupply.com/tsc/cms/life-out-here/pet/cats)
- [All](https://www.tractorsupply.com/tsc/cms/life-out-here/pet)
The Barn
- [Horse](https://www.tractorsupply.com/tsc/cms/life-out-here/the-barn/horse)
- [Livestock](https://www.tractorsupply.com/tsc/cms/life-out-here/the-barn/livestock)
- [Goats & Sheep](https://www.tractorsupply.com/tsc/cms/life-out-here/the-barn/goats-and-sheep)
- [Pigs](https://www.tractorsupply.com/tsc/cms/life-out-here/the-barn/pigs)
- [All](https://www.tractorsupply.com/tsc/cms/life-out-here/the-barn)
The Coop
- [Start Your Flock](https://www.tractorsupply.com/tsc/cms/life-out-here/the-coop/start-your-flock)
- [Poultry Breeds](https://www.tractorsupply.com/tsc/cms/life-out-here/the-coop/poultry-breeds)
- [Coop Tips](https://www.tractorsupply.com/tsc/cms/life-out-here/the-coop/coop-tips)
- [Chick Care](https://www.tractorsupply.com/tsc/cms/life-out-here/the-coop/chick-care)
- [All](https://www.tractorsupply.com/tsc/cms/life-out-here/the-coop)
Garden
- [Gardening Tips](https://www.tractorsupply.com/tsc/cms/life-out-here/garden/gardening-tips)
- [Growing Guides](https://www.tractorsupply.com/tsc/cms/life-out-here/garden/growing-guides)
Home & Land
- [Fresh Recipes](https://www.tractorsupply.com/tsc/cms/life-out-here/garden-home-land/fresh-recipes)
- [Heating & Cooling](https://www.tractorsupply.com/tsc/cms/life-out-here/garden-home-land/heating-and-cooling)
- [Bees](https://www.tractorsupply.com/tsc/cms/life-out-here/garden-home-land/bees)
- [Lawn](https://www.tractorsupply.com/tsc/cms/life-out-here/garden-home-land/lawn)
- [Fencing](https://www.tractorsupply.com/tsc/cms/life-out-here/garden-home-land/fencing)
- [All](https://www.tractorsupply.com/tsc/cms/life-out-here/garden-home-land)
Tool Shop
- [The Garage](https://www.tractorsupply.com/tsc/cms/life-out-here/tool-shop/the-garage)
- [Tool Tips](https://www.tractorsupply.com/tsc/cms/life-out-here/tool-shop/tool-tips)
- [Stock Your Shop](https://www.tractorsupply.com/tsc/cms/life-out-here/tool-shop/stock-your-shop)
- [All](https://www.tractorsupply.com/tsc/cms/life-out-here/tool-shop)
Outdoor Life
- [Birding](https://www.tractorsupply.com/tsc/cms/life-out-here/outdoor-life/birding)
- [Recreation](https://www.tractorsupply.com/tsc/cms/life-out-here/outdoor-life/recreation)
- [Hunting](https://www.tractorsupply.com/tsc/cms/life-out-here/outdoor-life/hunting)
- [All](https://www.tractorsupply.com/tsc/cms/life-out-here/outdoor-life)
1. [Home](https://www.tractorsupply.com/tsc/cms/life-out-here)
2. [Home & Land](https://www.tractorsupply.com/tsc/cms/life-out-here/garden-home-land)
3. [Fresh Recipes](https://www.tractorsupply.com/tsc/cms/life-out-here/garden-home-land/fresh-recipes)
4. Canning Supplies
# Canning Supplies
Aug 29, 2022
[Authored by Carol J. Alexander](https://www.tractorsupply.com/tsc/cms/life-out-here/authors/carol-j-alexander-home-improvement)

Your kitchen counters groan under the weight of vine-ripe tomatoes, and you can practically smell the rich goodness of home-canned sauce. You’ve read everything there is to know about canning, and you’re mentally ready to put this knowledge into practice. But, to preserve the fruit of your hard labor, you need the right tools and supplies. While you can fudge on a couple of the items, everything listed here will make the job easier and safer.
## Choose your canning method
First, choose which method of canning you’ll use. Two methods you will see are water bath canning and pressure canning.
### Water bath canning
You’ll need a [water bath canner](https://www.tractorsupply.com/tsc/product/granite-ware-215-qt-waterbath-canner-and-jar-rack "Links to water bath canner product.") for high-acid foods like fruits, acidified tomatoes, and pickles. A water bath canner is nothing more than a large pot that holds seven quart-size jars under water.
To process fruit and acidified tomatoes in a water bath canner, [follow these instructions](https://www.tractorsupply.com/tsc/cms/life-out-here/garden-home-land/fresh-recipes/guide-to-water-bath-canning "Links to step by step guide to water bath canning.").
### Pressure canning
Low-acid foods like vegetables and meats require the use of a [pressure canner](https://www.tractorsupply.com/tsc/product/national-presto-16-qt-pressure-canner "Links to pressure canner product."). A pressure canner uses less water than a water bath canner to create a pressurized compartment with higher temperatures than a boiling water bath.
To process low-acid foods in a pressure canner, [follow these instructions.](https://www.tractorsupply.com/tsc/cms/life-out-here/garden-home-land/fresh-recipes/pressure-canning-for-beginners "Links to pressure canning for beginners article.")
Both types of canners come with racks to support the jars. The rack separates the jars from the heat source to prevent them from breaking.
## Other canning supplies
There are a variety of [appliances and canning supplies](https://www.tractorsupply.com/tsc/catalog/canning "Links to all canning supplies catalog.") to make home canning more efficient. In addition to a canner and rack, you’ll need the following items.
__Jars and lids__
Only use [canning jars](https://www.tractorsupply.com/tsc/product/ball-wide-mouth-quart-jar-pack-of-12 "Links to canning jars product.") and lids created for home canning. They are specially made to withstand the rigors of the canning process.
__Canning funnel__
A canning funnel has a large mouth to accommodate the food you’ll spoon into the jar. Using one helps you avoid spills and messes.
__Large spoon or ladle__
Use a large spoon or ladle to spoon food into the jars.
__Chopstick or plastic knife__
After filling the jars, you’ll run this around the inside to encourage air bubbles to rise to the surface.
__Oven gloves__
Pot holders and oven mitts are awkward when handling hot jars. Seasoned canners recommend oven gloves that are thick enough to prevent burns yet have the fingers separated for a better grip.
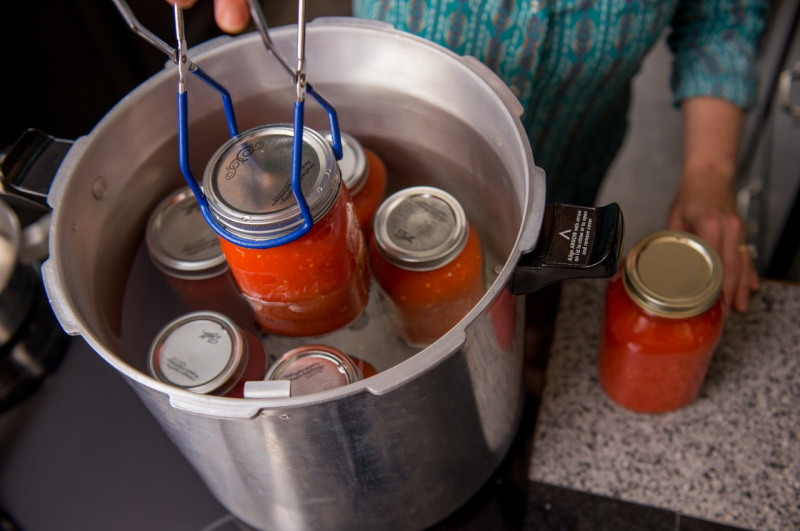
__Canning jar lifter__
A style of tongs, a canning jar lifter fits around the neck of the jar for a secure hold. It’s also rubber coated to prevent slipping. You’ll use it to remove the hot jars from the canner.
__Timer__
Canning recipes include a processing time. If you don’t already have a [kitchen timer](https://www.tractorsupply.com/tsc/product/escali-4-event-digital-timer-escldr6 "Links to kitchen timer product."), you’ll need one for canning.
### Can I use upcycled jars for canning
Upcycled pickle and mayonnaise jars are not reliable. Also, canning jars come in sizes ranging from a ¼-pint to ½-gallon. Use lids and bands that match the size of the jar’s mouth. [Canning lids](https://www.tractorsupply.com/tsc/product/ball-wide-mouth-lids "Links to canning lids product. ") are designed with a rubber seal to ensure freshness for up to 18 months. Canning jars and bands are reusable, but the flat lids are not.
* * *
## Canning on a budget
You can make do with what you have until you’re sure you want to add canning to your lifestyle. Here are a few tips for the frugal homesteader who wants to give it a go before investing in a lot of equipment.
- You can use a large stock pot and lid to water bath can. Just ensure the pot is deep enough for an inch of water to cover the jars, sitting on a rack, without boiling over.
- Create a makeshift rack with a few jar rings. Twist-tie them together and lay them in the bottom of the pot.
- Regular salad tongs don’t have enough gripping surface to substitute for a jar lifter. However, without a jar lifter, you can remove enough water from the canner using a ladle or measuring cup and then lift the jars with a gloved hand.
- Invite a friend to teach you, use their equipment, or borrow what you need.
- You can save a bit of money on the little tools by purchasing them in a [canning kit](https://www.tractorsupply.com/tsc/product/presto-7-piece-canning-kit "Links to canning kit product.").
## Is canning expensive
Buying a canner is a significant investment. If your first thought is to buy one used, safety is your first concern. Here are a few things to check for when buying a second-hand canner.
- Each season, have the gauge on a pressure canner tested for accuracy by an Extension Service agent or your local hardware store. If you buy a used pressure canner, have it tested before using it.
- The seal on some pressure canners wears out. To test the seal, run the canner with a few jars of water. If it leaks (as evidenced by escaping steam and the canner not coming up to pressure), order a new one.
- The thin metal and enamel coating of a water bath canner takes a lot of abuse. So before purchasing one second-hand, hold it up to the light and look for pin holes or cracks that could leak.
Find everything you need to preserve your harvest. Review our latest [canning equipment catalog](https://www.tractorsupply.com/tsc/cms/canning-supplies "Links to all canning supplies catalog.") so you can stock your kitchen with all the necessary supplies for putting food by to enjoy with friends and family.
Get the top deals, latest trends and more
Sign up for emails from Tractor Supply today.
First Name*
First Name*
Last Name*
Last Name*
Email*
Email*
Sign Up
### Customer Support
- [Order Status](https://www.tractorsupply.com/OrderLookUpView)
- [Return Policy](https://www.tractorsupply.com/tsc/customer-solutions#ProductReturns)
- [Delivery Options](https://www.tractorsupply.com/tsc/customer-solutions#DeliveryOptions)
- [Tax Exemptions](https://www.tractorsupply.com/tsc/cms/policies-information/customer-solutions/tax-exemption)
- [Frequently Asked Questions](https://www.tractorsupply.com/tsc/customer-solutions#CustomerFAQ)
- [Contact Us](https://www.tractorsupply.com/tsc/customer-solutions#contact)
- [Recall Notices](https://www.tractorsupply.com/tsc/cms/policies-information/customer-solutions/recall-notices.html)
- Call:
(877) 718-6750
- [](https://www.tractorsupply.com)
Mon - Sat: 7am - 9pm CT
- [](https://www.tractorsupply.com)
Sun: 8am - 7pm CT
- [](https://www.tractorsupply.com)
Closed Christmas Day
### About Us
- [Who We Are](https://corporate.tractorsupply.com/company-overview/company-profile/default.aspx)
- [Investor Relations](https://ir.tractorsupply.com/CorporateProfile)
- [Stewardship](https://corporate.tractorsupply.com/stewardship/overview/default.aspx)
- [Community](https://ir.tractorsupply.com/Peer)
- [Military Support](https://www.tractorsupply.com/tsc/cms/military)
- [Product Catalog](https://www.tractorsupply.com/a/pt/index)
- [Tractor Supply Stores](https://www.tractorsupply.com/tsc/store-locator)
- [.Pharmacy Verified Website](https://tractorsupply.com/tsc/cms/accreditation)
### Work With Us
- [Careers](https://www.tractorsupply.careers/?utm_source=corpsite&utm_campaign=TSC_Shop&cm_sp=footer-_-tsc%20careers)
- [Sponsorship](https://www.tractorsupply.com/tsc/cms/policies-information/about-tsc/sponsorships)
- [Affiliate Program](https://www.tractorsupply.com/tsc/cms/policies-information/affiliate-program)
- [Potential Vendor Partners](https://www.tractorsupply.com/tsc/cms/policies-information/vendor-information/potential-vendor-partners)
- [Vendor Information](https://www.tractorsupply.com/tsc/cms/policies-information/vendor-information/vendor-center)
- [Tractor Supply Media Network](https://www.tractorsupplymedianetwork.com/)
### Neighbor's Club
- [About](https://www.tractorsupply.com/tsc/cms/neighbors-club)
- [Rewards](https://www.tractorsupply.com/AccountDashboardView?catalogId=10051&langId=&storeId=10151&topNav=nCOfferReward%3Fcm_sp%3Dfooter-_-navigation-_-Neighbors%20Club%20Member)
- [Hometown Heroes](https://www.tractorsupply.com/tsc/myaccount/herobenefits)
- [Frequently Asked Questions](https://www.tractorsupply.com/tsc/cms/neighbors-club-faq)
- [Terms & Conditions](https://www.tractorsupply.com/tsc/cms/neighbors-club-terms-and-conditions)
### Credit Center
- [TSC Credit Card](https://www.tractorsupply.com/tsc/cms/credit)
- [Klarna](https://www.tractorsupply.com/tsc/cms/klarna)
### Stay Connected
Connect & Share with the Tractor Supply Community.
- [](https://www.facebook.com/TractorSupplyCo?cm_sp=footer-_-social%20icons-_-facebook)
- [](https://www.pinterest.com/tractorsupplyco?cm_sp=footer-_-social%20icons-_-pinterest)
- [](https://instagram.com/tractorsupply?cm_sp=footer-_-social%20icons-_-instagram)
- [](https://www.youtube.com/user/TSCTractorSupply?cm_sp=footer-_-social%20icons-_-youtube)
- [](https://www.tiktok.com/@tractorsupply?cm_sp=footer-_-social%20icons-_-tiktok)
### Tractor Supply App
Shop on the go with the Tractor Supply App
[Learn More](https://www.tractorsupply.com/tsc/cms/app.html)
[](https://apps.apple.com/us/app/id1502197298)
[](https://play.google.com/store/apps/details?id=com.consumerapp_v1)
### Customer Support
- [Order Status](https://www.tractorsupply.com/OrderLookUpView)
- [Return Policy](https://www.tractorsupply.com/tsc/customer-solutions#ProductReturns)
- [Delivery Options](https://www.tractorsupply.com/tsc/customer-solutions#DeliveryOptions)
- [Tax Exemptions](https://www.tractorsupply.com/tsc/cms/policies-information/customer-solutions/tax-exemption)
- [Frequently Asked Questions](https://www.tractorsupply.com/tsc/customer-solutions#CustomerFAQ)
- [Contact Us](https://www.tractorsupply.com/tsc/customer-solutions#contact)
- [Recall Notices](https://www.tractorsupply.com/tsc/cms/policies-information/customer-solutions/recall-notices.html)
- [Call:](https://www.tractorsupply.com) [(877) 718-6750](tel:%28877%29%20718-6750)
- [](https://www.tractorsupply.com)
Mon - Sat: 7am - 9pm CT
- [](https://www.tractorsupply.com)
Sun: 8am - 7pm CT
- [](https://www.tractorsupply.com)
Closed Christmas Day
### About Us
- [Who We Are](https://corporate.tractorsupply.com/company-overview/company-profile/default.aspx)
- [Investor Relations](https://ir.tractorsupply.com/CorporateProfile)
- [Stewardship](https://corporate.tractorsupply.com/stewardship/overview/default.aspx)
- [Community](https://ir.tractorsupply.com/Peer)
- [Military Support](https://www.tractorsupply.com/tsc/cms/military)
- [Product Catalog](https://www.tractorsupply.com/a/pt/index)
- [Tractor Supply Stores](https://www.tractorsupply.com/tsc/store-locator)
- [.Pharmacy Verified Website](https://tractorsupply.com/tsc/cms/accreditation)
### Work With Us
- [Careers](https://www.tractorsupply.careers/?utm_source=corpsite&utm_campaign=TSC_Shop&cm_sp=footer-_-tsc%20careers)
- [Sponsorship](https://www.tractorsupply.com/tsc/cms/policies-information/about-tsc/sponsorships)
- [Affiliate Program](https://www.tractorsupply.com/tsc/cms/policies-information/affiliate-program)
- [Potential Vendor Partners](https://www.tractorsupply.com/tsc/cms/policies-information/vendor-information/potential-vendor-partners)
- [Vendor Information](https://www.tractorsupply.com/tsc/cms/policies-information/vendor-information/vendor-center)
- [Tractor Supply Media Network](https://www.tractorsupplymedianetwork.com/)
### Neighbor's Club
- [About](https://www.tractorsupply.com/tsc/cms/neighbors-club)
- [Rewards](https://www.tractorsupply.com/AccountDashboardView?catalogId=10051&langId=&storeId=10151&topNav=nCOfferReward%3Fcm_sp%3Dfooter-_-navigation-_-Neighbors%20Club%20Member)
- [Hometown Heroes](https://www.tractorsupply.com/tsc/myaccount/herobenefits)
- [Frequently Asked Questions](https://www.tractorsupply.com/tsc/cms/neighbors-club-faq)
- [Terms & Conditions](https://www.tractorsupply.com/tsc/cms/neighbors-club-terms-and-conditions)
### Credit Center
- [TSC Credit Card](https://www.tractorsupply.com/tsc/cms/credit)
- [Klarna](https://www.tractorsupply.com/tsc/cms/klarna)
### Stay Connected
Connect & Share with the Tractor Supply Community.
- [](https://www.facebook.com/TractorSupplyCo?cm_sp=footer-_-social%20icons-_-facebook)
- [](https://www.pinterest.com/tractorsupplyco?cm_sp=footer-_-social%20icons-_-pinterest)
- [](https://instagram.com/tractorsupply?cm_sp=footer-_-social%20icons-_-instagram)
- [](https://www.youtube.com/user/TSCTractorSupply?cm_sp=footer-_-social%20icons-_-youtube)
- [](https://www.tiktok.com/@tractorsupply?cm_sp=footer-_-social%20icons-_-tiktok)
### Tractor Supply App
Shop on the go with the Tractor Supply App
[Learn More](https://www.tractorsupply.com/tsc/cms/app.html)
- [](https://apps.apple.com/us/app/id1502197298)
- [](https://play.google.com/store/apps/details?id=com.consumerapp_v1)
- [Privacy policy](https://www.tractorsupply.com/tsc/cms/policies-information/customer-solutions/privacy-policy.html)
- [Your Privacy Choices](#)
- [Terms and Conditions](https://www.tractorsupply.com/tsc/cms/policies-information/customer-solutions/terms-and-conditions-of-use.html)
- [California Transparency Act](https://www.tractorsupply.com/tsc/cms/policies-information/about-tsc/california-transparency-act-of-2010.html)
- [Legal Notices](https://www.tractorsupply.com/tsc/cms/policies-information/customer-solutions/legal-notices.html)
- [Accessibility](https://www.tractorsupply.com/tsc/cms/accessibility.html)
- [Responsible Disclosure Statement](https://www.tractorsupply.com/tsc/cms/policies-information/customer-solutions/responsible-disclosure-statement.html)
- [Surprise (Balance) Medical Billing Disclosure](https://www.tractorsupply.com/tsc/cms/surprise-billing)
- [Transparency in Coverage](https://transparency-in-coverage.uhc.com/?cm_sp=footer-_-navigation-_-transparency%20coverage)
- [Human Rights Policy](https://www.tractorsupply.com/tsc/cms/human-rights-policy)
- [Vendor Code of Conduct](https://www.tractorsupply.com/tsc/cms/vendor-code-of-conduct)
- [California Notice of Collection](https://www.tractorsupply.com/tsc/cms/policies-information/customer-solutions/privacy-policy#_Toc189006423)
- [Privacy Requests](https://privacyportal.tractorsupply.com/)
© 2026, Tractor Supply Co. All Rights Reserved.