


Suncast 8 ft. x 10 ft. Tremont Storage Shed
Suncast 8 ft. x 10 ft. Tremont Storage Shed
Item # 1202543


$1,599.99
or
or

Neighbor’s Club Members earn points with purchases.
$1,599.99
or
or
$48/mo.† for 36 months totaling $1728 at 3.99% APR or earn $79 in Rewards+ on this purchase.
Out of stock at or near
Grassland (franklin) TN
Out of stock delivering to
37027
This is a Big & Bulky item.
This item is not available
Search Stores
Temporarily unavailable
Neighbor’s Club Members earn points with purchases.
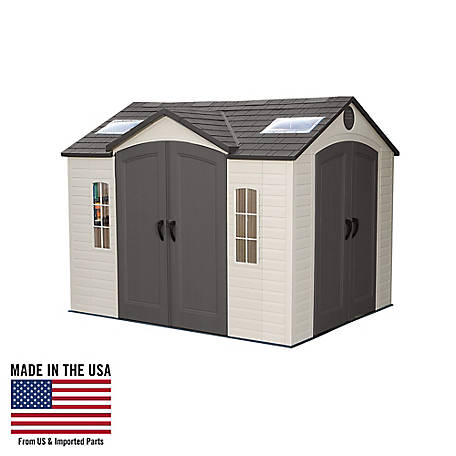
The Suncast Tremont 8 ft. x 10 ft. Storage Shed is constructed with steel-reinforced, double-walled shingle-style roof panels. These durable panels are built tough to withstand the elements. This premium shed has a reinforced floor to support tractors and other heavy items, and it comes with multiple skylights and 2 corner shelves for added convenience. Get your Suncast storage shed today.
- Reinforced shed floor for tractor support
- Storage shed includes 2 corner shelves with 8 optional locations
- 6 skylights to bring in natural light
- Pad-lockable metal handles (padlock not included) to help keep your shed secure
- Additional shelving, hooks and basket accessories available (not included - BMSA1S, BMSA2L and BMSA3B)
- Foundation required and not included
- Interior storage shed dimensions: 7 ft. 9 in. x 9 ft. 9 in. x 8 ft. 5 in.
- 10-year limited warranty
| Brand | Suncast |
|---|---|
| Country of Origin | Made in USA |
| Door Opening Height | 6 ft. |
| Door Opening Width | 60 in. |
| Exterior Height | 8 ft. 5 in. |
| Exterior Length | 8 ft. |
| Exterior Width | 10 ft. |
| Features | All Weather Construction |
| Floor Included | Floor Included |
| Interior Height | 7 ft. 9 in. |
| Interior Length | 8 ft. 4 in. |
| Interior Width | 9 ft. 9 in. |
| Maximum Roof Load | 20 lb. |
| Maximum Wind Resistance | 65 MPH |
| Number Of Entrances | 1 |
| Number Of Windows | 0 |
| Product Weight | 384 lb. |
| Roof Color | Brown |
| Roof Material | Resin |
| Door Type | Double Door |
| Siding Material | Resin |
| Shed Style | Gable |
| Siding Color | Beige |
| Storage Capacity | 574 cu. in. |
| Trim Color | Beige |
| Warranty | 10 Year Limited |
| Manufacturer Part Number | BMS8100 |
Have a question?
Start typing your question and we'll check if it was already asked and answered.
1 - 10 of 46 Questions
Newest questions
Q: Phone number please
a year ago1 Answer
- A: Hello, thank you for writing in. The manufacturer's contact information is: ***Suncast*** https://support.suncast.com/hc/en-us +1 (800) 846-2345 | 7:30 am - 6:00 pm CST (M-F)a year agoHelpful?
Q: What foundation required
a year ago1 Answer
- A: Hi there, The Foundation of Perfect Spaces The first step of a successful home project? Being prepared. Some of our outdoor sheds require concrete or wood foundations for proper assembly, and this quick reference has everything you’ll need to know to start off on the right foot. Concrete Foundations Use these standard steps—and helpful tips—to set up your concrete foundation. 1. Verify the base measurements of your shed or storage unit. Layout the foundation by using a mallet to drive wooden stakes into the ground at each of the four corners. • Tip: The concrete foundation should extend a minimum of 3 inches past the base in all directions. Position the stakes to be just outside the length of the foundation and even with the width. 2. Clear the area within the stakes using a shovel. Be sure to excavate the entire area 6 inches deep and level the site. Some terrain may require more depth to create a level surface at the bottom of the excavation. • Tip: Be sure to check local building codes and comply with the designated depth. Where possible, slope the surrounding terrain away from the foundation to allow for improved water drainage. 3. Measure the stakes and reposition them as necessary, taking care to include the 3-inch overhang per side. Drive the stakes into the ground so that they are level with the top of the excavation. Position plywood strips to be flush with the tops of the stakes. Use nails to attach plywood strips to the stakes. Add additional stakes along the outer perimeter of the plywood frame to prevent the frame from bowing when pouring concrete • Tip: If excavation is 6 inches deep, the top of the stake should be 6 inches up from the bottom surface of the site. For additional stakes, we recommend one every 8 to 10 inches. 4. Add crushed gravel until it fills approximately half of the excavation depth. Lay plastic sheeting over the gravel. If the excavation depth is 6 inches, add 3 inches of crushed gravel evenly across the entire site. • Tip: The plastic sheet will create a vapor barrier that will protect the concrete foundation from moisture damage. If building codes require, or if a heavy-duty application is desired, wire mesh should be placed on the plastic sheeting. Be careful not to pierce the plastic with any sharp edges. 5. Mix the concrete and water in a wheelbarrow according to manufacturer’s instructions. Pour over the surface of the gravel. 6. Use a 2 x 4 to level the foundation by bridging the plywood frame and sweeping it across the entire foundation. Level the concrete until it is completely smooth • Tip: Use a trowel to finish the concrete if desired. Note: Allow the concrete to cure for at least one week before placing any load on it. Materials Needed 1. Shovel 2. Metal Rake 3. Wheelbarrow 4. Wooden Stakes 5. Nails 6. Mallet 7. Measuring Tape 8. Crushed Gravel 9. Hammer 10. Concrete 11. Water Supply (garden hose) 12. Plywood (pressure treated or lumber suitable for ground contact and cut to the length/width of the excavation) 13. Plastic Sheeting 14. 2 x 4 Board 15. Wire Mesh (recommended for heavy duty applications or if codes require) Before You Begin • Check local building codes and required permits. • Locate buried utility lines prior to any digging and avoid disrupting or damaging any buried utility lines. Note: Refer to the instruction manual for detailed drawings, overall dimensions, and assembly instructions of the concrete foundation specific to your Suncast Shed model. Wood Foundations Use these standard steps—and helpful tips—to set up your wood foundation. 1. Assemble the wood foundation on a flat surface and set aside until the next steps are complete. • Tip: Use a driveway or a garage floor as a flat surface for assembly. Verify the overall size is correct and the foundation is square and level. 2. Use a mallet to lay out the foundation by driving stakes into the ground at each of the four corners. Once installed, tie a string from one stake to the other to create a border around the excavation site. • Tip: Extend the excavation site a minimum of 12 inches past the foundation in all directions. 3. Use a shovel to clear the area within the stakes 4-6 inches deep and level. Some terrain may require greater depth to create a level surface at the bottom of the excavation. • Tip: Be sure to check with local building codes and comply with the designated depth. Where possible, slope the surrounding terrain away from the foundation to allow for improved water drainage. 4. Line the entire bottom of the excavation with plastic sheeting and add crushed gravel until it fills the entire excavation. Be sure to spread gravel evenly across the entire site, using a 2 x 4 to help level. • Tip: Leveling the top layer is very important as it helps bear the heavy loads placed on the wood foundation. 5. Place and anchor the wood foundation on the gravel and be sure it is centered and level. • Tip: Rearrange gravel as need be to make sure the foundation is level, and anchor according to local building codes. Note: You can add a ramp to the entrance side (door side) of the shed foundation to allow for easy entry and exit. Materials Needed 1. Shovel 2. Metal Rake 3. Wooden Stakes 4. Mallet 5. String 6. Measuring Tape 7. Crushed Gravel 8. Plywood (pressure treated or lumber suitable for ground contact and cut to the length/width of the excavation) 9. Plastic Sheeting 10. 2 x 4 Board 11. Anchors (consult local building codes for suitable anchoring options) 12. Level Before You Begin ▪ Check local building codes and required permits. ▪ Locate buried utility lines prior to any digging and avoid disrupting or damaging any buried utility lines. Note: Refer to the instruction manual for detailed drawings, overall dimensions, and assembly instructions of the wood foundation specific to your Suncast Shed model. The shed must be anchored to the foundation through the indentations on the floor panels. For additional information please refer to the owners manual .a year agoHelpful?
Q: building instructions?
a year ago1 Answer
- A: Visit us at www.suncast.com to download a digital copy of the instruction manual .a year agoHelpful?
Q: Is the roof load really 20lbs?
a year ago1 Answer
- A: Maximum Roof Load is listed as 20lbs.a year agoHelpful?
Q: can I use this Suncast Storage Shed as an outhouse (which I would customize to use as our farm outhouse - we have the septic already in place)
a year ago1 Answer
- A: Hi Neighbor! Check with your local building department to understand any specific requirements for converting a shed into an outhouse.a year agoHelpful?
Q: Does this come in 2 seperate boxes?
2 years ago1 Answer
- A: Hello, Thank you for your question. According to the vendor, this item will come in two separate boxes.2 years agoHelpful?
Q: Does this model come without a floor. Ha concrete slab
2 years ago1 Answer
- A: Hi there, Foundation required and not included2 years agoHelpful?
Q: With this having a floor, can you just put this on level grass?
2 years ago1 Answer
- A: Hi, Great question, the manufacturer does suggest this shed is anchored. See below-Anchor according to local building codes.2 years agoHelpful?
Q: How do you anker this shed so wind doesn't blow it away?
2 years ago1 Answer
- A: Hi there, The Foundation of Perfect Spaces The first step of a successful home project? Being prepared. Some of our outdoor sheds require concrete or wood foundations for proper assembly, and this quick reference has everything you’ll need to know to start off on the right foot. Concrete Foundations Use these standard steps—and helpful tips—to set up your concrete foundation. 1. Verify the base measurements of your shed or storage unit. Layout the foundation by using a mallet to drive wooden stakes into the ground at each of the four corners. • Tip: The concrete foundation should extend a minimum of 3 inches past the base in all directions. Position the stakes to be just outside the length of the foundation and even with the width. 2. Clear the area within the stakes using a shovel. Be sure to excavate the entire area 6 inches deep and level the site. Some terrain may require more depth to create a level surface at the bottom of the excavation. • Tip: Be sure to check local building codes and comply with the designated depth. Where possible, slope the surrounding terrain away from the foundation to allow for improved water drainage. 3. Measure the stakes and reposition them as necessary, taking care to include the 3-inch overhang per side. Drive the stakes into the ground so that they are level with the top of the excavation. Position plywood strips to be flush with the tops of the stakes. Use nails to attach plywood strips to the stakes. Add additional stakes along the outer perimeter of the plywood frame to prevent the frame from bowing when pouring concrete • Tip: If excavation is 6 inches deep, the top of the stake should be 6 inches up from the bottom surface of the site. For additional stakes, we recommend one every 8 to 10 inches. 4. Add crushed gravel until it fills approximately half of the excavation depth. Lay plastic sheeting over the gravel. If the excavation depth is 6 inches, add 3 inches of crushed gravel evenly across the entire site. • Tip: The plastic sheet will create a vapor barrier that will protect the concrete foundation from moisture damage. If building codes require, or if a heavy-duty application is desired, wire mesh should be placed on the plastic sheeting. Be careful not to pierce the plastic with any sharp edges. 5. Mix the concrete and water in a wheelbarrow according to manufacturer’s instructions. Pour over the surface of the gravel. 6. Use a 2 x 4 to level the foundation by bridging the plywood frame and sweeping it across the entire foundation. Level the concrete until it is completely smooth • Tip: Use a trowel to finish the concrete if desired. Note: Allow the concrete to cure for at least one week before placing any load on it. Materials Needed 1. Shovel 2. Metal Rake 3. Wheelbarrow 4. Wooden Stakes 5. Nails 6. Mallet 7. Measuring Tape 8. Crushed Gravel 9. Hammer 10. Concrete 11. Water Supply (garden hose) 12. Plywood (pressure treated or lumber suitable for ground contact and cut to the length/width of the excavation) 13. Plastic Sheeting 14. 2 x 4 Board 15. Wire Mesh (recommended for heavy duty applications or if codes require) Before You Begin • Check local building codes and required permits. • Locate buried utility lines prior to any digging and avoid disrupting or damaging any buried utility lines. Note: Refer to the instruction manual for detailed drawings, overall dimensions, and assembly instructions of the concrete foundation specific to your Suncast Shed model. Wood Foundations Use these standard steps—and helpful tips—to set up your wood foundation. 1. Assemble the wood foundation on a flat surface and set aside until the next steps are complete. • Tip: Use a driveway or a garage floor as a flat surface for assembly. Verify the overall size is correct and the foundation is square and level. 2. Use a mallet to lay out the foundation by driving stakes into the ground at each of the four corners. Once installed, tie a string from one stake to the other to create a border around the excavation site. • Tip: Extend the excavation site a minimum of 12 inches past the foundation in all directions. 3. Use a shovel to clear the area within the stakes 4-6 inches deep and level. Some terrain may require greater depth to create a level surface at the bottom of the excavation. • Tip: Be sure to check with local building codes and comply with the designated depth. Where possible, slope the surrounding terrain away from the foundation to allow for improved water drainage. 4. Line the entire bottom of the excavation with plastic sheeting and add crushed gravel until it fills the entire excavation. Be sure to spread gravel evenly across the entire site, using a 2 x 4 to help level. • Tip: Leveling the top layer is very important as it helps bear the heavy loads placed on the wood foundation. 5. Place and anchor the wood foundation on the gravel and be sure it is centered and level. • Tip: Rearrange gravel as need be to make sure the foundation is level, and anchor according to local building codes. Note: You can add a ramp to the entrance side (door side) of the shed foundation to allow for easy entry and exit. Materials Needed 1. Shovel 2. Metal Rake 3. Wooden Stakes 4. Mallet 5. String 6. Measuring Tape 7. Crushed Gravel 8. Plywood (pressure treated or lumber suitable for ground contact and cut to the length/width of the excavation) 9. Plastic Sheeting 10. 2 x 4 Board 11. Anchors (consult local building codes for suitable anchoring options) 12. Level Before You Begin ▪ Check local building codes and required permits. ▪ Locate buried utility lines prior to any digging and avoid disrupting or damaging any buried utility lines. Note: Refer to the instruction manual for detailed drawings, overall dimensions, and assembly instructions of the wood foundation specific to your Suncast Shed model. The shed must be anchored to the foundation through the indentations on the floor panels. For additional information please refer to the owners manual .2 years agoHelpful?
Q: What is the recommended base for the shed
2 years ago1 Answer
- A: Hi, This one should fit your shed. Use the SKU number below in our website search box for more details. Arrow 8 ft. x 8 ft. Base Kit for Sheds, Fits 10 ft. x 8 ft. and 10 ft. x 9 ft. Sheds SKU: 168614599 $169.992 years agoHelpful?
1 - 10 of 46 Questions
Q&As
Have a question?
Start typing your question and we'll check if it was already asked and answered.
1 - 10 of 46 Questions
Newest questions
Q: Phone number please
a year ago1 Answer
- A: Hello, thank you for writing in. The manufacturer's contact information is: ***Suncast*** https://support.suncast.com/hc/en-us +1 (800) 846-2345 | 7:30 am - 6:00 pm CST (M-F)a year agoHelpful?
Q: What foundation required
a year ago1 Answer
- A: Hi there, The Foundation of Perfect Spaces The first step of a successful home project? Being prepared. Some of our outdoor sheds require concrete or wood foundations for proper assembly, and this quick reference has everything you’ll need to know to start off on the right foot. Concrete Foundations Use these standard steps—and helpful tips—to set up your concrete foundation. 1. Verify the base measurements of your shed or storage unit. Layout the foundation by using a mallet to drive wooden stakes into the ground at each of the four corners. • Tip: The concrete foundation should extend a minimum of 3 inches past the base in all directions. Position the stakes to be just outside the length of the foundation and even with the width. 2. Clear the area within the stakes using a shovel. Be sure to excavate the entire area 6 inches deep and level the site. Some terrain may require more depth to create a level surface at the bottom of the excavation. • Tip: Be sure to check local building codes and comply with the designated depth. Where possible, slope the surrounding terrain away from the foundation to allow for improved water drainage. 3. Measure the stakes and reposition them as necessary, taking care to include the 3-inch overhang per side. Drive the stakes into the ground so that they are level with the top of the excavation. Position plywood strips to be flush with the tops of the stakes. Use nails to attach plywood strips to the stakes. Add additional stakes along the outer perimeter of the plywood frame to prevent the frame from bowing when pouring concrete • Tip: If excavation is 6 inches deep, the top of the stake should be 6 inches up from the bottom surface of the site. For additional stakes, we recommend one every 8 to 10 inches. 4. Add crushed gravel until it fills approximately half of the excavation depth. Lay plastic sheeting over the gravel. If the excavation depth is 6 inches, add 3 inches of crushed gravel evenly across the entire site. • Tip: The plastic sheet will create a vapor barrier that will protect the concrete foundation from moisture damage. If building codes require, or if a heavy-duty application is desired, wire mesh should be placed on the plastic sheeting. Be careful not to pierce the plastic with any sharp edges. 5. Mix the concrete and water in a wheelbarrow according to manufacturer’s instructions. Pour over the surface of the gravel. 6. Use a 2 x 4 to level the foundation by bridging the plywood frame and sweeping it across the entire foundation. Level the concrete until it is completely smooth • Tip: Use a trowel to finish the concrete if desired. Note: Allow the concrete to cure for at least one week before placing any load on it. Materials Needed 1. Shovel 2. Metal Rake 3. Wheelbarrow 4. Wooden Stakes 5. Nails 6. Mallet 7. Measuring Tape 8. Crushed Gravel 9. Hammer 10. Concrete 11. Water Supply (garden hose) 12. Plywood (pressure treated or lumber suitable for ground contact and cut to the length/width of the excavation) 13. Plastic Sheeting 14. 2 x 4 Board 15. Wire Mesh (recommended for heavy duty applications or if codes require) Before You Begin • Check local building codes and required permits. • Locate buried utility lines prior to any digging and avoid disrupting or damaging any buried utility lines. Note: Refer to the instruction manual for detailed drawings, overall dimensions, and assembly instructions of the concrete foundation specific to your Suncast Shed model. Wood Foundations Use these standard steps—and helpful tips—to set up your wood foundation. 1. Assemble the wood foundation on a flat surface and set aside until the next steps are complete. • Tip: Use a driveway or a garage floor as a flat surface for assembly. Verify the overall size is correct and the foundation is square and level. 2. Use a mallet to lay out the foundation by driving stakes into the ground at each of the four corners. Once installed, tie a string from one stake to the other to create a border around the excavation site. • Tip: Extend the excavation site a minimum of 12 inches past the foundation in all directions. 3. Use a shovel to clear the area within the stakes 4-6 inches deep and level. Some terrain may require greater depth to create a level surface at the bottom of the excavation. • Tip: Be sure to check with local building codes and comply with the designated depth. Where possible, slope the surrounding terrain away from the foundation to allow for improved water drainage. 4. Line the entire bottom of the excavation with plastic sheeting and add crushed gravel until it fills the entire excavation. Be sure to spread gravel evenly across the entire site, using a 2 x 4 to help level. • Tip: Leveling the top layer is very important as it helps bear the heavy loads placed on the wood foundation. 5. Place and anchor the wood foundation on the gravel and be sure it is centered and level. • Tip: Rearrange gravel as need be to make sure the foundation is level, and anchor according to local building codes. Note: You can add a ramp to the entrance side (door side) of the shed foundation to allow for easy entry and exit. Materials Needed 1. Shovel 2. Metal Rake 3. Wooden Stakes 4. Mallet 5. String 6. Measuring Tape 7. Crushed Gravel 8. Plywood (pressure treated or lumber suitable for ground contact and cut to the length/width of the excavation) 9. Plastic Sheeting 10. 2 x 4 Board 11. Anchors (consult local building codes for suitable anchoring options) 12. Level Before You Begin ▪ Check local building codes and required permits. ▪ Locate buried utility lines prior to any digging and avoid disrupting or damaging any buried utility lines. Note: Refer to the instruction manual for detailed drawings, overall dimensions, and assembly instructions of the wood foundation specific to your Suncast Shed model. The shed must be anchored to the foundation through the indentations on the floor panels. For additional information please refer to the owners manual .a year agoHelpful?
Q: building instructions?
a year ago1 Answer
- A: Visit us at www.suncast.com to download a digital copy of the instruction manual .a year agoHelpful?
Q: Is the roof load really 20lbs?
a year ago1 Answer
- A: Maximum Roof Load is listed as 20lbs.a year agoHelpful?
Q: can I use this Suncast Storage Shed as an outhouse (which I would customize to use as our farm outhouse - we have the septic already in place)
a year ago1 Answer
- A: Hi Neighbor! Check with your local building department to understand any specific requirements for converting a shed into an outhouse.a year agoHelpful?
Q: Does this come in 2 seperate boxes?
2 years ago1 Answer
- A: Hello, Thank you for your question. According to the vendor, this item will come in two separate boxes.2 years agoHelpful?
Q: Does this model come without a floor. Ha concrete slab
2 years ago1 Answer
- A: Hi there, Foundation required and not included2 years agoHelpful?
Q: With this having a floor, can you just put this on level grass?
2 years ago1 Answer
- A: Hi, Great question, the manufacturer does suggest this shed is anchored. See below-Anchor according to local building codes.2 years agoHelpful?
Q: How do you anker this shed so wind doesn't blow it away?
2 years ago1 Answer
- A: Hi there, The Foundation of Perfect Spaces The first step of a successful home project? Being prepared. Some of our outdoor sheds require concrete or wood foundations for proper assembly, and this quick reference has everything you’ll need to know to start off on the right foot. Concrete Foundations Use these standard steps—and helpful tips—to set up your concrete foundation. 1. Verify the base measurements of your shed or storage unit. Layout the foundation by using a mallet to drive wooden stakes into the ground at each of the four corners. • Tip: The concrete foundation should extend a minimum of 3 inches past the base in all directions. Position the stakes to be just outside the length of the foundation and even with the width. 2. Clear the area within the stakes using a shovel. Be sure to excavate the entire area 6 inches deep and level the site. Some terrain may require more depth to create a level surface at the bottom of the excavation. • Tip: Be sure to check local building codes and comply with the designated depth. Where possible, slope the surrounding terrain away from the foundation to allow for improved water drainage. 3. Measure the stakes and reposition them as necessary, taking care to include the 3-inch overhang per side. Drive the stakes into the ground so that they are level with the top of the excavation. Position plywood strips to be flush with the tops of the stakes. Use nails to attach plywood strips to the stakes. Add additional stakes along the outer perimeter of the plywood frame to prevent the frame from bowing when pouring concrete • Tip: If excavation is 6 inches deep, the top of the stake should be 6 inches up from the bottom surface of the site. For additional stakes, we recommend one every 8 to 10 inches. 4. Add crushed gravel until it fills approximately half of the excavation depth. Lay plastic sheeting over the gravel. If the excavation depth is 6 inches, add 3 inches of crushed gravel evenly across the entire site. • Tip: The plastic sheet will create a vapor barrier that will protect the concrete foundation from moisture damage. If building codes require, or if a heavy-duty application is desired, wire mesh should be placed on the plastic sheeting. Be careful not to pierce the plastic with any sharp edges. 5. Mix the concrete and water in a wheelbarrow according to manufacturer’s instructions. Pour over the surface of the gravel. 6. Use a 2 x 4 to level the foundation by bridging the plywood frame and sweeping it across the entire foundation. Level the concrete until it is completely smooth • Tip: Use a trowel to finish the concrete if desired. Note: Allow the concrete to cure for at least one week before placing any load on it. Materials Needed 1. Shovel 2. Metal Rake 3. Wheelbarrow 4. Wooden Stakes 5. Nails 6. Mallet 7. Measuring Tape 8. Crushed Gravel 9. Hammer 10. Concrete 11. Water Supply (garden hose) 12. Plywood (pressure treated or lumber suitable for ground contact and cut to the length/width of the excavation) 13. Plastic Sheeting 14. 2 x 4 Board 15. Wire Mesh (recommended for heavy duty applications or if codes require) Before You Begin • Check local building codes and required permits. • Locate buried utility lines prior to any digging and avoid disrupting or damaging any buried utility lines. Note: Refer to the instruction manual for detailed drawings, overall dimensions, and assembly instructions of the concrete foundation specific to your Suncast Shed model. Wood Foundations Use these standard steps—and helpful tips—to set up your wood foundation. 1. Assemble the wood foundation on a flat surface and set aside until the next steps are complete. • Tip: Use a driveway or a garage floor as a flat surface for assembly. Verify the overall size is correct and the foundation is square and level. 2. Use a mallet to lay out the foundation by driving stakes into the ground at each of the four corners. Once installed, tie a string from one stake to the other to create a border around the excavation site. • Tip: Extend the excavation site a minimum of 12 inches past the foundation in all directions. 3. Use a shovel to clear the area within the stakes 4-6 inches deep and level. Some terrain may require greater depth to create a level surface at the bottom of the excavation. • Tip: Be sure to check with local building codes and comply with the designated depth. Where possible, slope the surrounding terrain away from the foundation to allow for improved water drainage. 4. Line the entire bottom of the excavation with plastic sheeting and add crushed gravel until it fills the entire excavation. Be sure to spread gravel evenly across the entire site, using a 2 x 4 to help level. • Tip: Leveling the top layer is very important as it helps bear the heavy loads placed on the wood foundation. 5. Place and anchor the wood foundation on the gravel and be sure it is centered and level. • Tip: Rearrange gravel as need be to make sure the foundation is level, and anchor according to local building codes. Note: You can add a ramp to the entrance side (door side) of the shed foundation to allow for easy entry and exit. Materials Needed 1. Shovel 2. Metal Rake 3. Wooden Stakes 4. Mallet 5. String 6. Measuring Tape 7. Crushed Gravel 8. Plywood (pressure treated or lumber suitable for ground contact and cut to the length/width of the excavation) 9. Plastic Sheeting 10. 2 x 4 Board 11. Anchors (consult local building codes for suitable anchoring options) 12. Level Before You Begin ▪ Check local building codes and required permits. ▪ Locate buried utility lines prior to any digging and avoid disrupting or damaging any buried utility lines. Note: Refer to the instruction manual for detailed drawings, overall dimensions, and assembly instructions of the wood foundation specific to your Suncast Shed model. The shed must be anchored to the foundation through the indentations on the floor panels. For additional information please refer to the owners manual .2 years agoHelpful?
Q: What is the recommended base for the shed
2 years ago1 Answer
- A: Hi, This one should fit your shed. Use the SKU number below in our website search box for more details. Arrow 8 ft. x 8 ft. Base Kit for Sheds, Fits 10 ft. x 8 ft. and 10 ft. x 9 ft. Sheds SKU: 168614599 $169.992 years agoHelpful?
1 - 10 of 46 Questions
Similar Items
-
-
-
-
-
-
Top Rated
-
-
Top Rated
-
-
-
-



Frequently Bought Together
-
-
-
-
-
-
-
-
-
-
-
-
Top Rated






Reviews
- setup
- price
- instructions
- purchase
- satisfaction
- quality
- durability
- sturdy
1 to 4 of 94 Reviews .
1 – 4 of 94 Reviews
Most Recent
Ct
Review 1
5 out of 5 stars.
Great for the price we paid!!
a year ago
Great little shed. Fits rising lawnmower and push mower along with a bunch of other crap. Got a great deal since we only paid eight ninety nine. It looked to be a leftover they were just trying to get rid of since the box was disintegrating and falling apart. The 6th roof panel was a little rough to line up.
Yes, I recommend this product.
Buffalo ny
Review 1
5 out of 5 stars.
Shed
2 years ago
This unit was easy to set up and install
SweepstakesYes
Yes, I recommend this product.
Charlotte
Reviews 4
5 out of 5 stars.
Great place
2 years ago
Easy to assemble Suncast shed. Everyone at tractor supply was awesome! We love this store.
SweepstakesYes
Yes, I recommend this product.
Coal Township PA
Review 1
3 out of 5 stars.
Shipping process a nightmare
2 years ago
Tractor supply used a delivery company that would not deliver to our house due to size of truck. My husband had to meet the delivery truck in a random part of town and transfer the shed into a truck he had to borrow from someone. This whole process caused my husband to miss work and we were still charged a delivery fee for over 200.00. We would not purchase a larger item from tractor supply ever again.
SweepstakesYes
No, I do not recommend this product.